
Killer Whale Simulation Quick Start Tutorial
To run a simulation you generally perform the following steps:
This quick start tutorial walks you though the steps but only examines a small
number of the parameters and features that are available. For more
information about the parameters, see the Documents and Reference page.
1. Setting Simulation Parameters
The files that determine the parameters for your run are stored in the KillerWhaleParms folder that should be located in your "My Documents" or default folder.
Editing batch.txt
The master file for running a simulation in batch mode is called batch.txt . Double-click the file to open it with a text editor. You should see a large number of parameters, e.g.:
runs: 1

BatchFileName {
  set_string: batch.txt
}

BatchRunLength {
 set: 500
}

useConstantPreyPopulation {
 set_boolean: false
}

FileParameters {
  set_string: popparms.csv
}

FilePopulation {
  set_string: population50.csv
}

FilePrey {
  set_string: prey3.csv
}

...
You can set these variables to whatever you like for
the simulation. For example, if "useConstantPreyPopulation" is set
to true then once a year the population of the prey is reset back to its initial
population (i.e. the prey population may grow or decline during a year, but when
the "birth day" comes around, the population will be reset).
The FileParameters, FilePopulation, and FilePrey parameters specify three different files that describe the survival rates, initial whale population, and prey population. They are briefly described later in this document.
A complete list of parameters and a description of their function is found in the file batch parameter template.txt. To activate a set of parameters from the template, copy them into the batch.txt file.
As an example, change the beginning of the batch file so that it appears as follows:
runs: 1

BatchFileName {
 set_string: batch.txt
}

BatchRunLength {
  set: 10
}

GutMassPercent {
  start: 0.045
  end: 0.055
  incr: 0.005
}
...
This configuration states that the simulation should make one run per set of parameters. Each run lasts ten years. This is too short to get meaningful results, but can be useful to run quick tests. The parameter that varies is GutMassPercent, which specifies a killer whale's maximum daily consumption as a fixed proportion of its target mass. It starts at 0.045 and increases by 0.005 until it reaches 0.055. This means that within the one run, three separate sub-runs will be made, the first where GutMassPercent = 0.045, the second where GutMassPercent = 0.050, and the third where GutMassPercent = 0.055.
Editing Population Parameters
The popparms.csv file contains the default survival rates for killer whales. The file starts as:
Age,F Survival,M Survival,Mx
0,0.7,,
0,0.75,0.75,0
1,0.98,0.98,0
2,0.99,0.99,0
3,0.99,0.99,0
The first column is the age, the second is the yearly survival rate for females, the third is the yearly survival rate for males, and the last column is the probability of pregnancy. For example, three year old males and females both have a 99% chance of survival. One exception to this format are the entries for age 0. The first entry is the neonate survival, and the second is the survival after six months.
You can simply edit the file with the desired probabilities. The probabilities are constant for each run.
Editing Initial Whale Population
The simulation comes with an initial population of 50 whales. You can change this by editing the file population50.csv. If you rename the file (e.g., no longer 50 whales) then make sure to change the name so it matches in batch.txt. Here is a short listing from the file:
0,F,82,-4,D
1,F,81,-3,D
2,F,72,-2,D
3,F,67,-1,D
4,F,63,1,A
5,F,60,0,A
6,F,57,1,A
The first column is a unique ID for each whale. The second column is "F" for female and "M" for male. The third column is the age. The fourth column is the ID of the whale's mother (negative if no mother listed). The last columns is "D" for deceased and "A" for alive.
Editing Prey
The last file that will typically need to be edited before a run is to set the available prey for the killer whales. Two sample prey files are included, prey3.csv which includes three different types of prey, and prey.csv which has only one prey. These files contain parameters for the population of each prey species (density dependent), and vulnerability parameters dependent on the size of the killer whale's group (e.g. an adult humpback whale is not vulnerable to a single killer whale, but has some vulnerability to 10 killer whales). Each prey species is split up into two categories, newborns and adults.
To change the parameters in a meaningful way, an Excel spreadsheet has been provided. Open the file named PreyWorksheets.xls. The preyDD worksheet allows you to experiment with the BirthMax, Birth_a, Birth_b, n0Surv_Max, n0Surv_a, n0Surv_b, AdSurv_Max, AdSurv_a, and AdSurv_b parameters and view the resulting populations graphically. The preyVulnerability worksheet allows you to experiment with the 0_encounter_rate, 0_Vuln, 0_VulnA, 0_VulnB, ad_encounter_rate, ad_Vuln, ad_VulnA, and ad_VulnB parameters and view the resulting graphs of vulnerabity to killer whale group size. Finally, the worksheet SpeciesList has complete parameters for various prey species.
After you have generated the desired prey parameters, paste them into the prey.csv file you are using and add in the initial number of prey for adults and newborns, reproduction birth date, and energetics.
Editing Prey Adjustments
There is also a file named preyAdjustments.txt that can
simulate the harvesting or regime shift of prey. See the comments in the
file for more information.
2. Running the Simulation
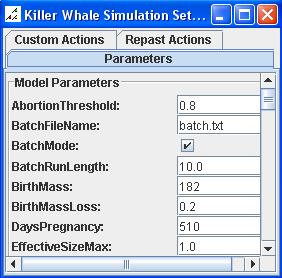
After the parameters have been edited in their respective files you can run the simulation by double-clicking on the runwhale.bat icon located on your desktop (or runwhale.sh on Unix systems). This should start the Repast toolbar on the top right of the screen, and a parameter window on the right of your screen:
The parameters window will be populated with default values and overridden by the values you entered into the batch.txt file. You can enter new values manually into this window if you wish.
Running in Batch Mode
Normally, a simulation will be run in batch mode. Batch mode shows no graphics during runtime, making the simulation run faster, and automatically changes parameters as specified in batch.txt.
To start a simulation in batch mode, make sure the
BatchMode box is checked.
Then, click on the button with three arrows: 
The Tick Count value should change for each day of the simulation. Status information will also be sent to the Repast output window. Depending on the parameters of the simulation, this step may take seconds, minutes, or hours to complete.
After the simulation is done, click on the red X to exit.
Running in GUI Mode
It is also possible to run a simulation in GUI mode. This mode shows the whale population at each step of the simulation. You can also generate graphs dynamically. This mode is most useful for testing simulation parameters, as it is much slower than batch mode.
To run in GUI mode make sure the BatchMode box is unchecked.
Then
click on the button with one arrow: 
Various graphs and displays will be shown that depict the population, group size, and whale demographics. A sample screenshot is shown below:
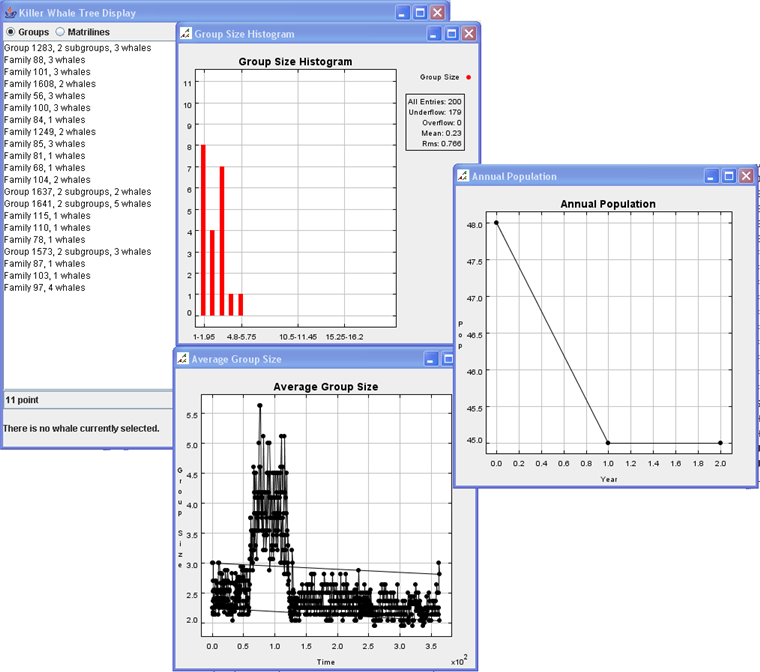
You can generate your own custom graphs. Under the "Repast Actions" tab, click on "Create/Edit Charts" and follow the prompts. For more information about controlling a Repast simulation, see the Repast HowTo Documentation.
3. Analyzing Simulation
Results
After a simulation has finished, results will be stored in the KillerWhaleParms/results folder. Every simulation will be contained in a sub-folder that is named with the date and time when the simulation completed. For example, the folder named 2007-05-20-00-29-14 indicates that this run completed on May 20, 2007, at 12:29:14 AM. The folder should contain the following files:
Back to Documentation and
Reference