CS221
Introduction to MMX
MMX™ was introduced by Intel in late 1997 amid much fanfare and commercials featuring bunny people. MMX promised to increase the speed of our games and multimedia programs. Unfortunately for Intel, some companies were slow to adopt MMX and the shift from 2D to 3D games meant that MMX was not as applicable. As a result, the release of MMX did not become a major selling point as Intel hoped. Nevertheless, it is today an important feature in many applications. What is MMX? MMX technology consists of a number of additional machine instructions from the basic Intel instruction set that operate on data in parallel. This technology is typically used to speed up common routines used in multimedia or mathematical calculations.
For MMX to work, the software in question must contain some inherent parallelism. A wide range of software applications, including graphics, MPEG video, music synthesis, speech compression and recognition, image processing, games, and video conferencing show many common, fundamental characteristics that lend themselves well to parallelism:
- small integer data types (for example: 8-bit pixels, 16-bit audio samples)
- small, highly repetitive loops
- frequent multiplies and accumulates
- compute-intensive algorithms
- highly parallel operations
Before diving into how MMX works, let’s examine Flynn’s taxonomy of programming models. Flynn identified four categories of programming:
1. Single Instruction stream, Single Data stream (SISD)
2. Multiple Instruction stream, Single Data stream (MISD)
3. Single Instruction stream, Multiple Data stream (SIMD)
4. Multiple Instruction stream, Multiple Data stream (MIMD)
The SISD model is the one you have been using in most of your programming courses to date. There is one stream of instructions and one stream of data that these instructions operate open. The processor performs one instruction at a time on each data item.

SISD
The MISD model is rarely used (but might have potential for problems such as classification). In the MISD model, there are many instructions that are applied to a single data stream. This means that we apply many different instructions to the same piece of data.
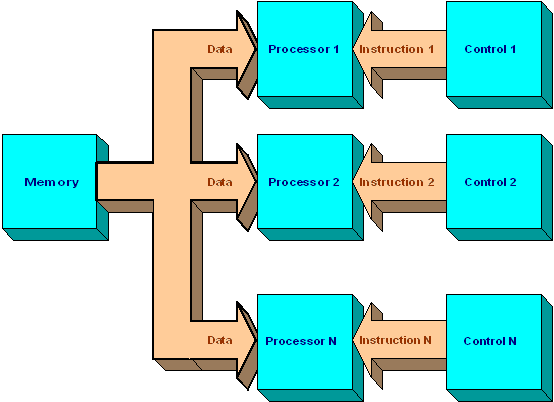
MISD
The SIMD model is the one that MMX operates under. There is a single stream of instructions, but each instruction can operate in parallel on multiple pieces of data. The processors operate synchronously: at each step, all processors execute the same instruction on a different data element. SIMD computers are much more versatile that MISD computers. Numerous problems covering a wide variety of applications can be solved by parallel algorithms on SIMD computers. Another interesting feature is that algorithms for these computers are relatively easy to design, analyze and implement. On the downside, only problems that can be subdivided into a set of identical subproblems all of which are then solved simultaneously by the same set of instructions can be tackled with SIMD computers. There are many computations that do not fit this pattern: such problems are typically subdivided into subproblems that are not necessarily identical, and are solved using MIMD computers.
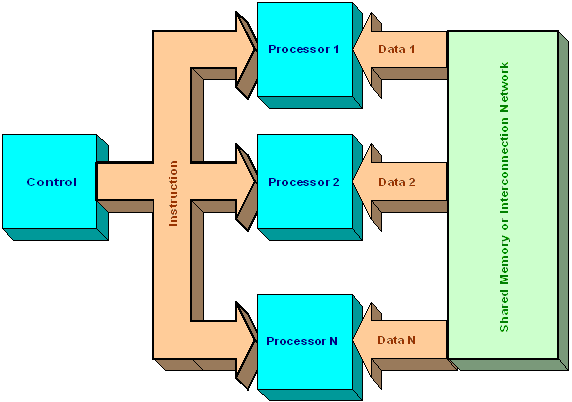
SIMD
The last model, MIMD, uses multiple processors with multiple data streams. Each processor has its own independent data stream. Each processor operates under the control of an instruction stream issued by its control unit: therefore the processors are potentially all executing different programs on different data while solving different subproblems of a single problem. This means that the processors usually operate asynchronously. The MIMD model of parallel computation is the most general and powerful: computers in this class are used to solve in parallel those problems that lack the regular structure required by the SIMD model. On the downside, asynchronous algorithms are difficult to design, analyze and implement.
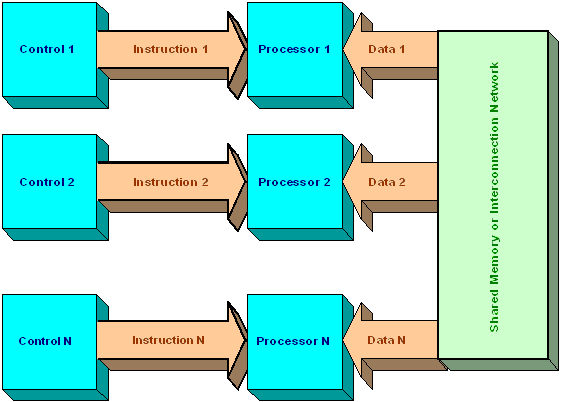
MIMD
Now that we have covered the basic programming models, let’s return to MMX. MMX operates under the SIMD model, so this operates best on programs that apply the same operation to multiple pieces of data.
The highlights of MMX are:
57 new instructions
8 64-bit wide MMX registers
4 new data types
The MMX registers are each 64 bits wide and are named MM0 through MM7. These registers are actually overlapped with the floating point registers, so it is not possible to interleave floating point and MMX instructions with each other if they reference the same register. As an advantage though, we can use the floating point instructions to save/restore the floating point registers and this will also apply to the MMX registers.
The four MMX technology data types are:
- Packed byte - 8 bytes packed into one 64-bit quantity
- Packed word - 4 16-bit words packed into one 64-bit quantity
- Packed doubleword – 2 32-bit double words packed into one 64-bit quantity
- Quadword - one 64-bit quantity. The Qword data type is used as a typecast.
As an example, graphics pixel data are generally represented in 8-bit integers, or bytes. With MMX technology, eight of these pixels are packed together in a 64-bit quantity and moved into an MMX register; when an MMX instruction executes, it takes all eight of the pixel values at once from the MMX register, performs the arithmetic or logical operation on all eight elements in parallel, and writes the result into an MMX register. The degree of parallelism that can be achieved with the MMX technology depends on the size of data, ranging from 8 when using 8-bit data to 1, i.e. no parallelism, when using 64-bit data.

We are now ready to describe some of the MMX instructions. In general, each MMX instruction is of the format:
OPCODE dest-operand, src-operand
The classes of instructions cover:
- Data transfer instructions for MMX register-to-register transfers, or 64-bit and 32-bit load/store to memory
- Basic arithmetic operations such as add, subtract, multiply, arithmetic shift and multiply-add
- Comparison operations
- Conversion instructions to convert between the new data types: pack data together, and unpack from small to larger data types
- Logical and shift operations such as AND, AND NOT,OR, XOR, and SHIFT.
- State management instruction to handle MMX to floating point transitions
We won’t cover all of these, but will look at some of them.
To start, we need some way to transfer data into an MMX register. We do this with the MOVQ or MOVD instructions:
MOVD: Copies 32 bits from the source operand to the destination operand. The operands can be either an MMX register, a 32-bit register, or a memory location. When the destination is an MMX register, the low-order 32 bits are copied and the high-order 32 bits are filled with zeros. When the source is an MMX register, the low-order 32 bits only are copied.
Examples:
movd mm0, eax ; Copy eax to low order bits of mm0
movd eax, mm0 ; Copy low order bits of mm0 to eax
movd mm0, dword ptr myvar ; Copy 4 bytes from myvar to mm0
movd mm0, dword ptr [ebx] ; Use indirect addressing to copy to mm0
MOVQ: Copies 64 bits from the source operand to the destination operand. The destination and source operands can be either MMX registers or 64-bit memory operands, but MOVQ cannot transfer data from memory to memory.
Examples:
movq mm0, qword ptr myvar ; Copy 8 bytes from myvar to mm0
movq mm0, mm1 ; Copy mm1 to mm0
movq qword ptr myvar, mm0 ; Copy 8 bytes to memory at myvar
movq mm0, qword ptr [ebx] ; Indirect addressing

Note that bytes are copied from memory in reverse byte order.
Next, let’s examine some of the arithmetic instructions. These are the instructions that will actually give us speedup through the use of SIMD processing. The MMX technology supports both saturating and wraparound modes. In wraparound mode, results that overflow or underflow are truncated and only the lower (least significant) bits of the result are returned. This is the way normal arithmetic works in the computer. In saturation mode, results of an operation that overflow or underflow are clipped (saturated) to a data-range limit for the data type. The result of an operation that exceeds the range of a data type saturates to the maximum value of the range, while a result that is less than the range of a data type saturates to the minimum value of the range. This method of handling overflow and underflow is useful in many applications, such as color calculations. For examine, using an unsigned byte, the saturation range is from 0-255. Any value that results in less than zero or more than 255 is clipped accordingly.
PADD : Packed Add
PADDB dest, src ; Add packed bytes
PADDW dest, src ; Add packed words
PADDD dest, src ; Add packed doubleword
These instructions add the data elements of the source operand to the data elements of the destination, and the result is written to the destination. If the result exceeds the data range limit, it wraps around.
PADDDS : Packed Add with Saturation
PADDSB dest, src ; Add packed bytes w/saturation
PADDSW dest, src ; Add packed words w/saturation
These instructions are as above, but add with saturation instead of wrap around.
PADDUS : Packed Add Unsigned with Saturation
PADDUSB dest, src ; Add packed bytes unsigned w/saturation
PADDUSW dest, src ; Add packed words unsigned w/saturation
The PADDUS (Packed Add Unsigned with Saturation) instructions add the packed unsigned data elements of the source operand to the packed unsigned data elements of the destination operand and saturate the results. Note that there is no Packed Add Unsigned without saturation.
PSUB : Packed Subtract
PSUBB dest, src ; Subtract packed bytes
PSUBW dest, src ; Subtract packed words
PSUBD dest, src ; Subtract packed doubleword
The PSUB (Packed Subtract) instructions subtract the data elements of the source operand from the data elements of the destination operand. If the result is larger or smaller than the data-range limit for the data type, it wraps around.
PSUBS : Packed Subtract with Saturation
PSUBSB dest, src ; Subtract packed bytes w/saturation
PSUBSW dest, src ; Subtract packed words w/saturation
Similar to add with saturation, but subtracts instead.
PSUBUS : Packed Subtract Unsigned with Saturation
PSUBUSB dest, src ; Subtract packed bytes unsigned w/saturation
PSUBUSW dest, src ; Subtract packed words unsigned w/saturation
As a simple example of packed add, consider the following:
.data
vector1 byte 1,2,3,4,5,6,7,8
vector2 byte 1,1,1,1,1,1,1,1
.code
movq mm0, qword ptr vector1
movq mm1, qword ptr vector 2
paddb mm0,mm1 ; mm0 now contains 2,3,4,5,6,7,8,9
As an example of saturated arithmetic, let us consider the absolute difference of two arrays of bytes: there are no IF statements in MMX, but it is necessary to implement the following algorithm:
for (i=0; i<8; i++) {
if (a[i] > b[i])
then c[i] = a[i] – b[i]
else c[i] = b[i] – a[i]
}
This algorithm can be coded using saturated substractions on unsigned values: subtracting a from b and b from a. Due to the saturated arithmetic, rather than get a negative result, one of the results will be zero. The other will be the desired absolute difference. However, since it is impossible to know which is which, the final result is achieved by ORing them together:
c = (a – b) OR (b – a)
Assuming that the MMX registers named MM0 and MM1 hold the source vectors, the following code will compute the absolute difference and store it into MM0:
movq mm, mm0 ; make a copy of MM0
psubusb mm0, mm1 ; compute difference one way
psubusb mm1, mm2 ; compute difference the other way
por mm0, mm1 ; OR them together (packed OR instruction)
There are three multiply instructions:
PMULLW – Packed Multiply Low. This multiplies the four signed words of the source and destination operands and writes the low-order bits of the result to the destination.
PMULHW – Packed Multiply High. This multiplies the four signed words of the source and destination operands and writes the high-order bits of the result to the destination.
PMADDWD - Packed Multiply and Add
This instruction multiplies the four signed words of the destination operand by the four signed words of the source operand. The two high-order words are summed and stored in the upper doubleword of the destination operand, and the two low-order words are summed and stored in the lower doubleword of the destination operand. This process is illustrated in the figure below:

This type of operation is useful, for example, in computing the dot product of two vectors. This type of basic operation is commonly used in filters and various multimedia applications. If our vector is longer then four elements, we will need to perform this operation in groups of four until we process the entire vector.
There are two types of comparison instructions:
PCMPEQ : Packed Compare for Equal
PCMPEQB dest, src ; Compare packed bytes
PCMEQW dest, src ; Compare packed words
PCMEQD dest, src ; Compare packed dwords
These instructions compare the data elements in the destination operand to the corresponding data elements in the source operand. If the data elements are equal, the corresponding data element in the destination register is set to all ones, if they are not, it is set to all zeros.
PCMPGT : Packed Compare for Greater Than
PCMPGTB dest, src ; Compare packed bytes
PCMPGTW dest, src ; Compare packed words
PCMPGTD dest, src ; Compare packed dwords
Similar to above, but uses a greater-than comparison instead of equality.
For a description of the other instruction, see the references link at the end of this document.
How much performance is gained from using MMX? In theory, we could see anywhere from a
Another downside is that most compilers do not support these instructions. You have to learn all these instructions sets and then code them in plain assembly yourself. Fortunately, there are a variety of toolkits released by Intel that programmers can use from high level languages (e.g. C++) that will take advantage of the MMX instruction set for typical scenarios.
The figure below shows performance increases on benchmarks that were coded using MMX vs. those coded without MMX.

Beyond MMX
There now exist a number of extensions to MMX:
SSE - Streaming SIMD Extensions
SSE enhances the Intel x86 architecture in four ways:
- 8 new 128-bit SIMD floating-point registers that can be directly addressed. SSE supports operating on four 32 bit floating point values in parallel.
- 50 new instructions that work on packed floating-point data;
- 8 new instructions designed to control cacheability of all MMX and 32-bit x86 data types, including the ability to stream data to memory without polluting the caches, and to prefetch data before it is actually used;
- 12 new instructions that extend the MMX instruction set.
This set enables the programmer to develop algorithms that can mix packed, single-precision, floating-point and integer using both SSE and MMX instructions respectively.
SSE2 – Streaming SIMD Extensions 2
The major new feature in SSE2 is the ability to process 64 bit floats. However, the register size is still 128 bits, so we can only process two 64 bit floats in parallel. SSE2 also supports 128bit MMX instructions.
3DNOW!
The AMD 3D Now! technology was AMD’s answer to MMX and SSE. It provides 21 additional instructions to support high-performance 3D graphics and audio processing. The 3D Now! instructions are vector instructions that operate on 64-bit registers, divided into two 32-bit single-precision floats. As with MMX and SSE, programs must be written specifically to use the 3DNOW instruction set, causing potential incompatibilities among software.
AltiVec
AltiVec is Motorola’s version of MMX and SSE, and is used in the Macintosh PowerPC. Through a 128 bit vector, it supports;
16-way parallelism for 8-bit signed and unsigned integers
8-way parallelism for 16-bit signed and unsigned integers
4-way parallelism for 32-bit signed and unsigned integer and IEEE floats.
MMX Code Samples
The first example shows how MMX can be used to sum up the values in an array of 80 numbers. To use it, we must add the .MMX directive to MASM.
Include
Irvine32.inc
.686
.MMX
.data
array byte 80 dup(1)
sumeight byte 8 dup(?)
.code
main proc
call SumNumsNonMMX
call SumNumsWithMMX
exit
main endp
;;;;;;;;;;;;;;;;;;;;;;;;;;;;;;;;;;;;;
;
Sums all 80 numbers the old way
;;;;;;;;;;;;;;;;;;;;;;;;;;;;;;;;;;;;;
SumNumsNonMMX proc
; Sum the traditional way
mov
ebx, offset array
mov
eax, 0
mov
ecx, 0
SumLoop:
movzx
edx, byte ptr [ebx]
add eax, edx
inc ebx
inc ecx
cmp
ecx, 80
jl
SumLoop
call writeint ;
Total of 80
call crlf
ret
SumNumsNonMMX endp
;;;;;;;;;;;;;;;;;;;;;;;;;;;;;;;;;;;;;
;
Sums all 80 numbers using MMX
;;;;;;;;;;;;;;;;;;;;;;;;;;;;;;;;;;;;;
SumNumsWithMMX proc
mov
ebx, offset array
add ebx, 8
movq
mm0, qword ptr [ebx]
mov
ecx, 8 ;
Already read in first 8 numbers
SumLoopMMX:
movq
mm1, qword ptr [ebx] ; Move in
next 8 numbers
paddb
mm0, mm1 ; Add all 8
numbers in parallel
add ebx, 8
add ecx, 8
cmp
ecx, 80
jl
SumLoopMMX
; Need to sum each byte in mm0
movq
qword ptr sumeight, mm0
mov
ecx, 8
mov
eax, 0
mov
ebx, offset sumeight
SumFinalMMX:
movzx
edx, byte ptr [ebx]
add eax, edx
inc ebx
loop SumFinalMMX
call writeint
call crlf
ret
SumNumsWithMMX endp
end
main
You will notice that a lot more code is necessary to perform the MMX add. This is because we need extra code to step through the data in groups of eight and to also compute the sum of the final eight values. However, the total number of instructions executed is less; instead of looping 80 times, the MMX code sum loop only repeats 9 times, with a single loop of 8 iterations to compute the final sum.
The next example compiles in real mode. It switches to 320x200 graphics mode and sets up a palette of 64 shades of green. It then fades the screen in and out from black to bright green by incrementing and decrementing the value of each pixel on the screen. In non-MMX mode, this is done one pixel at a time. In MMX mode, this is done 8 pixels at a time.
Include
Irvine16.inc
.686
.MMX
.data
eightOnes byte 1,1,1,1,1,1,1,1
eightNegs byte -1,-1,-1,-1,-1,-1,-1,-1
.code
main proc
mov
ax, @data
mov
ds, ax
; Set up vectors of -1 and +1 in the MMX
registers
movq
mm1, qword ptr eightOnes
movq
mm2, qword ptr eightNegs
; Set video mode to graphics
mov
ah, 0
mov
al, 13h
int
10h
; Set ES to video graphics
mov ax, 0A000h
mov es, ax
call SetupPalette
call ZeroScreen
;call FadeScreenNonMMX ;
Switch comments to change modes
call FadeScreenWithMMX ;
Switch comments to change modes
; restore text mode
mov
ah, 0
mov
al, 3
int
10h
exit
main endp
;;;;;;;;;;;;;;;;;;;;;;;;;;;;;;;;;;;;;;;;;;;;;;;;;;;;;;;
;
Increment and then decrement each pixel in the screen
; so we get a fade effect.
Do this without MMX,
; one pixel at a time.
;;;;;;;;;;;;;;;;;;;;;;;;;;;;;;;;;;;;;;;;;;;;;;;;;;;;;;;
FadeScreenNonMMX proc
; Fill screen repeatedly with colors
mov
al, 1
mov
cx, 0
IncrementLoop:
call CheckKey
cmp
dx, 1
je
EndDraw
call UpdateScreen ;
non MMX
inc cx
cmp
cx, 63
jl
IncrementLoop
mov
al, -1
DecrementLoop:
call CheckKey
cmp
dx, 1
je
EndDraw
call UpdateScreen ;
Non MMX
dec
cx
cmp
cx, 1
jne
DecrementLoop
mov
al, 1
jmp
IncrementLoop
EndDraw:
ret
FadeScreenNonMMX endp
;;;;;;;;;;;;;;;;;;;;;;;;;;;;;;;;;;;;;;;;;;;;;;;;;;;;;;;
;
Increment and then decrement each pixel in the screen
; so we get a fade effect.
Do this without MMX,
; one pixel at a time.
;;;;;;;;;;;;;;;;;;;;;;;;;;;;;;;;;;;;;;;;;;;;;;;;;;;;;;;
FadeScreenWithMMX proc
; Fill screen repeatedly with colors
mov
al, 1
mov
cx, 0
IncrementLoop:
call CheckKey
cmp
dx, 1
je
EndDraw
call UpdateScreenMMX ;
with MMX
inc cx
cmp
cx, 63
jl
IncrementLoop
mov
al, -1
DecrementLoop:
call CheckKey
cmp
dx, 1
je
EndDraw
call UpdateScreenMMX ;
with MMX
dec
cx
cmp
cx, 1
jne
DecrementLoop
mov
al, 1
jmp
IncrementLoop
EndDraw:
ret
FadeScreenWithMMX endp
;;;;;;;;;;;;;;;;;;;;;;;;;;;;;;;;;;;;;;;;;;;;;;;;;;;;;;;
;
Adds
;;;;;;;;;;;;;;;;;;;;;;;;;;;;;;;;;;;;;;;;;;;;;;;;;;;;;;;
UpdateScreen proc
push bx
;call WaitVrt
mov
ebx,0
UpdateLoop:
add es:[bx], al
inc ebx
cmp
ebx, 64000 ;
64000= 320*200
jne
UpdateLoop
pop bx
ret
UpdateScreen endp
;;;;;;;;;;;;;;;;;;;;;;;;;;;;;;;;;;;;;;;;;;;;;;;;;;;;;;
;
Using MMX, either add or subtract 8 bytes at a time
; and send them to the video screen
;;;;;;;;;;;;;;;;;;;;;;;;;;;;;;;;;;;;;;;;;;;;;;;;;;;;;;;
UpdateScreenMMX proc
push bx
mov
ebx,0
;call WaitVrt
cmp
al, -1
je
UpdateLoopNeg
UpdateLoopPos:
movq
mm0,es:[bx]
paddb
mm0, mm1
movq
es:[bx],mm0
add ebx,8
cmp
ebx,64000
jl
UpdateLoopPos
jmp
ExitUpdate
UpdateLoopNeg:
movq
mm0,es:[bx]
paddb
mm0, mm2
movq
es:[bx],mm0
add ebx,8
cmp
ebx,64000
jl
UpdateLoopNeg
ExitUpdate:
pop bx
ret
UpdateScreenMMX endp
;;;;;;;;;;;;;;;;;;;;;;;;;;;;;;;;;;;;;;;;;;;;;;;;;;;;;;;
; Set
palette to 64 shades of green
;;;;;;;;;;;;;;;;;;;;;;;;;;;;;;;;;;;;;;;;;;;;;;;;;;;;;;;
SetupPalette proc
mov
cx, 0
PalLoop:
mov dx, 3c8h ; Video palette port
mov al, cl ; The color index we want to set
out dx, al ; Says
to set color index to
; Load shade of green using RGB
mov
dx, 3c9h ;
RGB color for current color index
mov
al, 0 ; 0 red
out dx, al
mov
al, cl ;
CL green, varies in intensity with loop
out dx, al
mov
al, 0 ; 0 blue
out dx, al
inc cx
cmp
cx, 64
jne
PalLoop
ret
SetupPalette endp
;;;;;;;;;;;;;;;;;;;;;;;;;;;;;;;;;;;;;;;;;;;;;;;;;;;;;;;
;
Sets every pixel on the screen to zero
;;;;;;;;;;;;;;;;;;;;;;;;;;;;;;;;;;;;;;;;;;;;;;;;;;;;;;;
ZeroScreen proc
; Zero out the screen
mov
bx,0
mov
al, 0
UpdateLoop:
mov
es:[bx], al
inc bx
cmp
bx, 64000 ;
64000= 320*200
jne
UpdateLoop
ret
ZeroScreen endp
;;;;;;;;;;;;;;;;;;;;;;;;;;;;;;;;;;;;;;;;;;;;;;;;;;;;;;;
;
Wait for the Vertical Retrace to begin
;
Use if there is flashing on the screen
;;;;;;;;;;;;;;;;;;;;;;;;;;;;;;;;;;;;;;;;;;;;;;;;;;;;;;;
WaitVrt proc
push ax
push dx
mov
dx, 3dah
Vrt:
in al, dx
test al, 1000b
jnz
vrt ;
Wait for vertical retrace to begin
NoVrt:
in al, dx
test al, 1000b
jz
NoVrt ;
Wait for retrace to end
pop dx
pop ax
ret
WaitVrt endp
;;;;;;;;;;;;;;;;;;;;;;;;;;;;;;;;;;;;;;;;;;;
; CheckKey
;
;
This procedure sets DX to 1 if there
;
is a key waiting to be read, and sets
;
DX to 0 if there is no keypress.
;;;;;;;;;;;;;;;;;;;;;;;;;;;;;;;;;;;;;;;;;;;
CheckKey PROC
push ax
mov
ah, 11h
int
16h ; BIOS interrupt for keypress
jz
NoKeyWaiting
mov
dx, 1
pop ax
ret
NoKeyWaiting:
mov
dx, 0
pop ax
ret
CheckKey ENDP
end
main
References
MMX Primer: http://docs.tommesani.com/MMXPrimer.html
MMX Technology Overview: http://www.intel.com/technology/itj/q31997/articles/art_2.htm